Azureの大規模ネットワーク ~BGPって?
はじめに
masamoriです。
普段私はAzureを使って仕事をしています。アプリを作るにせよLLMを使うにせよ、きちんとした製品レベルのものを作ろうとした場合、ネットワークの構築は不可欠です。
私はネットワークエンジニアではないのですが、Azureのネットワーク設定は非常に簡単で、小規模のものであればルーターなど考えなくてもいけます。裏側でAzureが勝手に設定してくれるので。
しかし、オンプレミス環境との繋ぎや、ある程度規模が大きくなってくるとネットワークの知識が必要になってきます。
幸いにも、まだ大規模ネットワークを構築する場面に遭遇したことがないので、来る日のためにこの本でAzureのネットワークについて勉強しています。
ワンチャン可愛い!
騙されてはいけません、内容はめちゃくちゃ骨太です。最初の章こそ入門レベルですが、途中から複雑なネットワークの構築のプラクティスが入ってきます。
勉強するのに重要なことは実際に自分で作ってみることです。でも、大規模ネットワークなんて作れません。それこそオンプレミス環境なんて用意できないですしね。(Ciscoのルータなんて持ってない)。
しかし、複雑なネットワーク構成を理解しておくと、普段の業務に必ず役に立ちます。書籍に載ってるような、こんな大規模なネットワークを一人で作るなんてまずないですからね。素振りのつもりで、大規模なネットワークを解き明かしていきます。
さて前述の通り、私はネットワークエンジニアではありません。なので、専門用語でわからない事があったら備忘録として記事を書いていきます。また、具体的にAzureのどのサービスに関わりがあるのかも書きたいと思います。今日はBGP(Border Gateway Protocol)。
使用するAzure サービス
### BGP 経路情報を交換するためのプロトコルですが、その詳細を理解することはネットワーク管理において非常に重要です。BGPは「経路(ルート)」そのものではなく、「経路情報を広告(Advertise)・交換・学習するためのプロトコル」なのです。
オンプレミスとの繋ぎが主なユースケースです。前述の本でもそうです。
BGPと経路(Route)の違い
Advertise(広告)とは?
- 自分が到達できるプレフィックス(IPネットワーク)を「このネットワークは自分経由で到達可能だよ」とピアに通知する行為
- 逆に「もうその経路はダメだ」というときはWithdraw(撤回)も行う
BGPの大まかな流れ
1. BGPセッション確立(TCP 179)
2. OPEN → KEEPALIVEでお互いのAS(Access Point)番号や能力交換
3. 自分が持っている経路をUPDATEメッセージでAdvertise
4. 相手も同様にUPDATEで自分の経路を送ってくる
5. 受け取った経路情報は「BGPテーブル(RIB)」に保存
6. 最適経路選択(属性比較)したうえで「ルーティングテーブル」に反映
7. 経路に変更があれば再度UPDATE(Advertise/Withdraw)
BGPの機能
BGPはAdvertiseだけでなく、以下の機能も持っています:
セッション管理
BGPセッションを確立し、維持します。属性交換
AS Path、Next Hop、MED、LocalPrefなどの属性を交換します。経路の優劣選定
獲得した経路情報を比較して最適な経路を選びます。Withdraw(経路撤回)
使用できない経路情報を撤回します。
結論
- BGP=経路そのもの ではなく、「経路情報をお互いに通知し、最適経路を選ぶ仕組み」です。
- 経路(Route)=「到達可能なネットワークとネクストホップ等の情報」です。
- Advertise=「経路を相手に知らせる」アクション、Withdraw=「経路を取り下げる」アクション。
このように、「BGPは経路を広告(Advertise)する仕組み」であり、広告された情報をもとにルーター内部で経路を構築・更新しています。
ちなみに、BGPについてのFQはこちら。
重要なのは、BGPはプロトコルであるという点だと思います。
セッションを張るので、トンネルのようにも見えますが、その目的はあくまで つ以上のネットワーク間でルーティングと到達可能性の情報を交換するためのものです。
BGPのイメージ図はこちら.
[オンプレ AS65001]                      [Azure AS65515]
      ↓ BGP広告                            ↓ BGP広告
  10.11.11.0/24 ─────────────→    10.0.0.0/16, 10.3.0.0/16
      ↑ ←────ルート学習────────────↑
Function Buildar その先に
はじめに
masamoriです。
前回、こういう記事を書きました。
この後実際にissueを出して聞いてみたところ、ソッコーで回答が返ってきました。こういうフォローを惜しみなくしてくれると、ライブラリ使いたくなりますよね。ユーザーに対しての誠実さが伝わってきます。そのissueと回答はこちら
Pythonのワーカー呼び出しのタイミングでbuildされるようです。なので、FunctionのPython Libraryのリポジトリではなくこのリポジトリに答えが書いてありました。
今回は、このworkerを中心にソースコードを追っていきたいと思います。
ちなみにissueでの回答にもあるように、pythonワーカーとC#で書かれたAzure Functionホスト部の呼び出し関係のシーケンス図はちょっと古いらしく、更新しとくねと言ってくれました。最高。
Python worker
そもそもPythonワーカーとはなんでしょうか?
一言で言うと.
と言えると思います。
Azure Functionの実態はC#で書かれたホスト部に存在しており、そこからの要求を受け取ってレスポンスを返すという役割を果たします。ワーカーの主な仕事は
- Pythonの関数を読み込む
- 関数を実行する
- 結果をHostに返す.
です。なので、ホスト部から見るとワーカーはクライアントなんですね。Pythonのコードはこのワーカーを通じて実行されるので、前回紹介したAzure Function Pythonライブラリはワーカーを定義したモジュールにインポートされて、実行されます。
と言うわけで、buildを実行している(実際にFunctionが生成される)部分にフォーカスしてソースコードを読みます。
コードは、azure-function-python-workerリポジトリのlorder.pyです。
@attach_message_to_exception(
      expt_type=ImportError,
      message='Cannot find module. Please check the requirements.txt '
              'file for the missing module. For more info, '
              'please refer the troubleshooting '
              f'guide: {MODULE_NOT_FOUND_TS_URL}. '
              f'Current sys.path: {sys.path}',
      debug_logs='Error in index_function_app. '
                 f'Sys Path: {sys.path}, Sys Module: {sys.modules},'
                 'python-packages Path exists: '
                 f'{os.path.exists(CUSTOMER_PACKAGES_PATH)}')
  def index_function_app(function_path: str):
      module_name = pathlib.Path(function_path).stem
      imported_module = importlib.import_module(module_name)

      from azure.functions import FunctionRegister # ここでbuildが定義されているPython Libraryがimport
      app: Optional[FunctionRegister] = None
      for i in imported_module.__dir__():
          if isinstance(getattr(imported_module, i, None), FunctionRegister):
              if not app:
                  app = getattr(imported_module, i, None)
              else:
                  raise ValueError(
                      f"More than one {app.__class__.__name__} or other top "
                      f"level function app instances are defined.")

      if not app:
          script_file_name = get_app_setting(
              setting=PYTHON_SCRIPT_FILE_NAME,
              default_value=f'{PYTHON_SCRIPT_FILE_NAME_DEFAULT}')
          raise ValueError("Could not find top level function app instances in "
                           f"{script_file_name}.")

      return app.get_functions()
では、index_function_appが呼ばれる場所は?
def index_functions(self, function_path: str, function_dir: str):
          indexed_functions = loader.index_function_app(function_path) ## ここで呼ばれる
          logger.info(
              "Indexed function app and found %s functions",
              len(indexed_functions)
          )

          if indexed_functions:
              fx_metadata_results, fx_bindings_logs = (
                  loader.process_indexed_function(
                      self._functions,
                      indexed_functions,
                      function_dir))

              indexed_function_logs: List[str] = []
              indexed_function_bindings_logs = []
              for func in indexed_functions:
                  func_binding_logs = fx_bindings_logs.get(func)
                  for binding in func.get_bindings():
                      deferred_binding_info = func_binding_logs.get(
                          binding.name)\
                          if func_binding_logs.get(binding.name) else ""
                      indexed_function_bindings_logs.append((
                          binding.type, binding.name, deferred_binding_info))

                  function_log = "Function Name: {}, Function Binding: {}" \
                      .format(func.get_function_name(),
                              indexed_function_bindings_logs)
                  indexed_function_logs.append(function_log)

              logger.info(
                  'Successfully processed FunctionMetadataRequest for '
                  'functions: %s. Deferred bindings enabled: %s.', " ".join(
                      indexed_function_logs),
                  self._functions.deferred_bindings_enabled())

              return fx_metadata_results
メタデータとして付与されて、結果を返します。このメタデータの中に、buildが定義されているFuncttionRegisterインスタンスも含まれています。
このメタデータを呼び出し定義は以下。
def load_function_metadata(self, function_app_directory, caller_info):
          """
          This method is called to index the functions in the function app
          directory and save the results in function_metadata_result or
          function_metadata_exception in case of an exception.
          """
          script_file_name = get_app_setting(
              setting=PYTHON_SCRIPT_FILE_NAME,
              default_value=f'{PYTHON_SCRIPT_FILE_NAME_DEFAULT}')

          logger.debug(
              'Received load metadata request from %s, request ID %s, '
              'script_file_name: %s',
              caller_info, self.request_id, script_file_name)

          validate_script_file_name(script_file_name)
          function_path = os.path.join(function_app_directory,
                                       script_file_name)

          # For V1, the function path will not exist and
          # return None.
          self._function_metadata_result = (
              self.index_functions(function_path, function_app_directory)) \ # ここでindex_functionを含んだメタデータ定義
              if os.path.exists(function_path) else None
では最後です。grpcクライアント(後述)が受け取った、ホストサーバーからのリクエストを処理するハンドラーの中でload_function_metadataが実行されます。
async def _handle__function_load_request(self, request):
          func_request = request.function_load_request
          function_id = func_request.function_id
          function_metadata = func_request.metadata
          function_name = function_metadata.name
          function_app_directory = function_metadata.directory

          logger.info(
              'Received WorkerLoadRequest, request ID %s, function_id: %s,'
              'function_name: %s, function_app_directory : %s',
              self.request_id, function_id, function_name,
              function_app_directory)

          programming_model = "V2"
          try:
              if not self._functions.get_function(function_id):

                  if function_metadata.properties.get(
                          METADATA_PROPERTIES_WORKER_INDEXED, False):
                      # This is for the second worker and above where the worker
                      # indexing is enabled and load request is called without
                      # calling the metadata request. In this case we index the
                      # function and update the workers registry

                      try:
                          self.load_function_metadata( #ここでメタデータ呼び出し。結果としてbuildが走る
                              function_app_directory,
                              caller_info="functions_load_request")
                      except Exception as ex:
                          self._function_metadata_exception = ex

                      # For the second worker, if there was an exception in
                      # indexing, we raise it here
                      if self._function_metadata_exception:
                          raise Exception(self._function_metadata_exception)

                  ...(略)
ソースコードは以上です。
全体の流れ
コードだけ読んでいても全体の流れは分かりにくいので、シーケンス図を書いてみました。
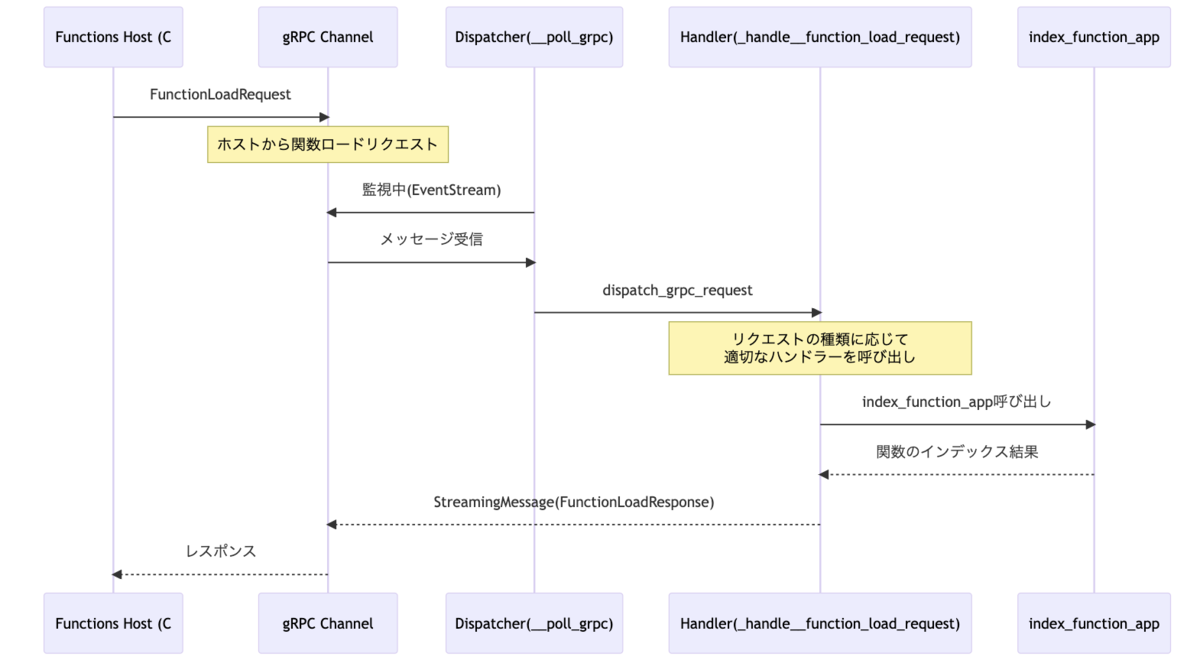 .
.
Fucntions HostとPython Workerにだけ絞って流れを書くとこんな感じ?
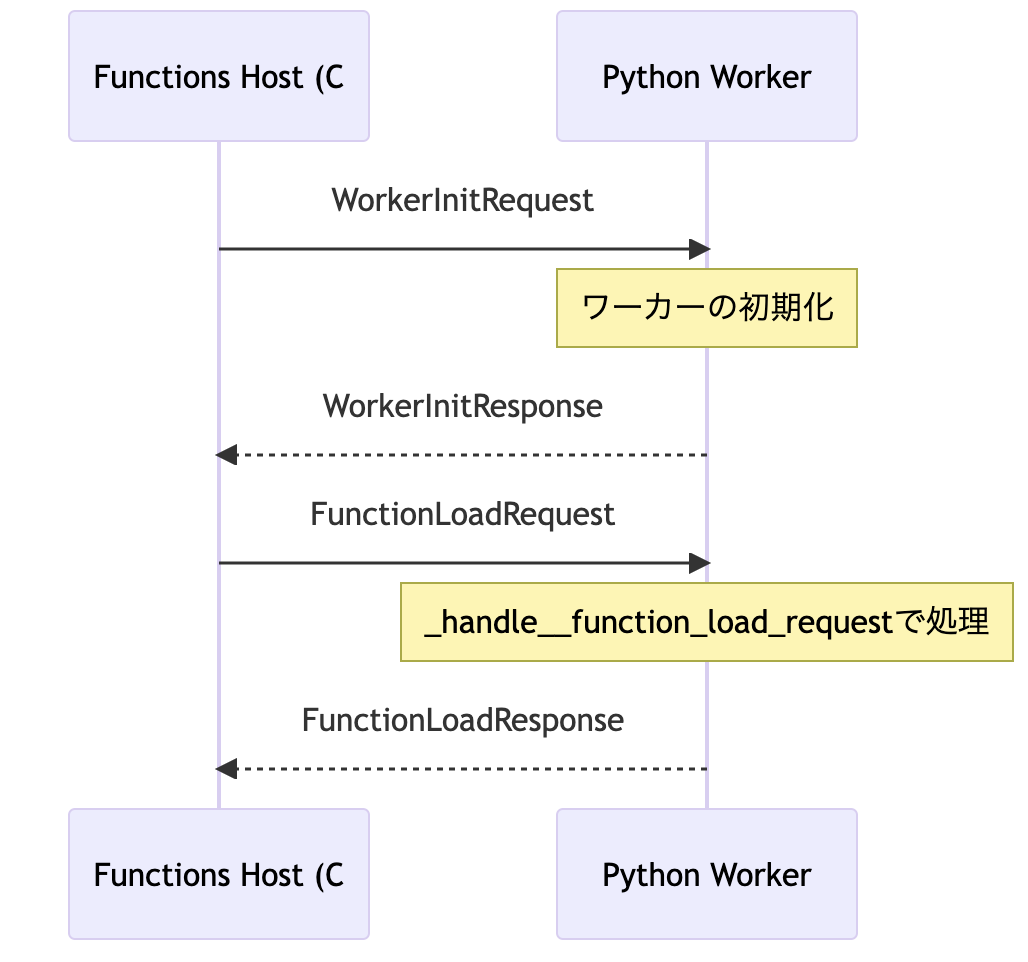
grpc
grpcとは「Google Remote Procedure Call」の略で、Googleが開発したサービス間通信を行うフレームワークです。バイナリベースで通信を行うため、RESTよりも速い通信が可能です。また、今回のケースで言うとホストが起点となるクライアントへの通信が発生するので、Web Socket的な通信が必要です。grpcはHTTP/2プロトコルで通信を行うのでその問題も解決。
この辺はもう少し深掘りをしてみたいところです。
Python? Or C#?
と言うわけで、buildしてる場所も分かり、PythonでなぜAzure Functionが動くのか多少理解ができました。少し気になったのは、結局ホストがC#で書かれているのでそいつを直接呼び出しちゃえば、通信のオーバーヘッドがなくなるような気がするんですよね。まぁ、Pythonで書いていて今のところ通信の遅延で困ったことはありませんが、より厳密な通信速度が必要な場合、C#で書く方がいいのかなと予想できます。それとも、C#でもクライアントとホスト分けてるのかな?その辺は分からないです。
とにかく一番感動したのは、アーキテクチャよりも、ただの一ユーザーに対して質問のissueに真面目に答えてくれた開発者の心意気です。
理解が深まりました。ありがとうございます。自分もそういう開発者でありたい。
Azure Function Python実装から分かるBuildarパターン
はじめに
masamoriです。
何かとお世話になることが多いAzure Function。簡単なAPIバックエンドだったら、もうこれだけでいいでしょみたいな雰囲気があります。
私はPythonしか使えないので、実装は全てPythonで行なっています。実装の面では、ドキュメントを読めば特に困ることはありませんが、深く知りたい場合はソースコードを読む必要があります。深く知りたくなくても、ソースコードを読むと勉強になることが多々あります。
Azure FunctionのPythonライブラリはオープンソースになっているので、誰でも読めますし、issueも出せます。
今日はソースコードを読んで勉強になったことや気づいたことを書きます。
処理の流れとコードの確認
お馴染みのHTTPトリガーは以下の通り
app = func.FunctionApp(http_auth_level=func.AuthLevel.ANONYMOUS)
@app.route(route="http_trigger")
FunctionAppをインスタンス化して、デコレータとしてhttpトリガーを指定します。
たったこれだけでhttpトリガーを実現できてしまうわけなんですが、後ろ側で動いているコードの流れを追うと以下の通りです。FunctionAppから追いましょう。
class FunctionApp(FunctionRegister, TriggerApi, BindingApi, SettingsApi):
  ...(中略)
# TriggerApiの呼び出し
  →
  class TriggerApi(DecoratorApi, ABC):
      """Interface to extend for using existing trigger decorator functions."""

      # routeがhttpトリガー
      def route(self,
                route: Optional[str] = None,
                trigger_arg_name: str = 'req',
                binding_arg_name: str = '$return',
                methods: Optional[
                    Union[Iterable[str], Iterable[HttpMethod]]] = None,
                auth_level: Optional[Union[AuthLevel, str]] = None,
                trigger_extra_fields: Optional[Dict[str, Any]] = None,
                binding_extra_fields: Optional[Dict[str, Any]] = None
                ) -> Callable[..., Any]:
  ...(中略)
         # デコレータでFunctionBuilderをインスタンス化する
         # 以下のデコレータはDecoratorApiに実装してある
    @self._configure_function_builder
           def wrap(fb):
               def decorator():
                   fb.add_trigger(trigger=HttpTrigger(
                       name=trigger_arg_name,
                       methods=parse_iterable_param_to_enums(methods, HttpMethod),
                       auth_level=parse_singular_param_to_enum(auth_level,
                                                               AuthLevel),
                       route=route, **trigger_extra_fields))
                   fb.add_binding(binding=HttpOutput(
                       name=binding_arg_name, **binding_extra_fields))
                   return fb

               return decorator()
           return wrap
    ...(中略)
    ⇨
    class DecoratorApi(ABC):
      """Interface which contains essential decorator function building blocks
      to extend for creating new function app or blueprint classes.
      """

      def __init__(self, *args, **kwargs):
          self._function_builders: List[FunctionBuilder] = []
          self._app_script_file: str = SCRIPT_FILE_NAME
  ...

    def _validate_type(self,
                          func: Union[Callable[..., Any], FunctionBuilder]) \
               -> FunctionBuilder:
           """Validate the type of the function object and return the created
           :class:`FunctionBuilder` object.
           :param func: Function object passed to
            :meth:`_configure_function_builder`
           :raises ValueError: Raise error when func param is neither
            :class:`Callable` nor :class:`FunctionBuilder`.
           :return: :class:`FunctionBuilder` object.
           """
           if isinstance(func, FunctionBuilder):
               fb = self._function_builders.pop()
           elif callable(func):
               fb = FunctionBuilder(func, self._app_script_file)
           else:
               raise ValueError(
                   "Unsupported type for function app decorator found.")
           return fb

       # デコレータの定義 こいつが呼びだされてバリデーションされたものがFunctionBuilderオブジェクトとしてリストに追加される
       # _validate_typeでFunctionBuildarをインスタンス化
       def _configure_function_builder(self, wrap) -> Callable[..., Any]:
           """Decorator function on user defined function to create and return
            :class:`FunctionBuilder` object from :class:`Callable` func.
           """

           def decorator(func):
               fb = self._validate_type(func)
               self._function_builders.append(fb)
               return wrap(fb)

           return decorator

    ...(中略)
    ⇨
    class FunctionBuilder(object):
        def __init__(self, func, function_script_file):
           self._function = Function(func, function_script_file)
         ...(中略)

    # このbuildでFunctionオブジェクトを生成して、ユーザー定義関数がFunctionとして使用可能になる
    def build(self, auth_level: Optional[AuthLevel] = None) -> Function:
           """
           Validates and builds the function object.

           :param auth_level: Http auth level that will be set if http
           trigger function auth level is None.
           """
           self._validate_function(auth_level)
           return self._function
ちょっと長くなりましたが、以上のような流れでユーザーが定義した関数をFunctionとして使用することが可能になります。
Buildarパターン
このFunctionクラスとFunctionBuildarの関係ですが、Factoryパターンみたいに一般的な名前がついているらしく、Builderパターンと呼ばれているそうです。
このパターンを使う適切な場合は、
- コンストラクタで設定するパラメータが多い場合
- 選択肢を多く用意して、ユーザー(開発者)が任意の機能を選びやすいように設計をする
- 順序が大事な時
だいたいこんな感じだそう。
wikiはjavaのパターンなので、PythonのパターンをGPTに生成してもらいました。
class House:
       """家を表すクラス"""
       def __init__(self):
           self.foundation = None
           self.walls = None
           self.roof = None
           self.windows = []
           self.door = None
           self.has_garage = False

   class HouseBuilder:
       """家を建てるためのビルダー"""
       def __init__(self):
           self._house = House()

       def build_foundation(self, material):
           self._house.foundation = material
           return self  # 自分自身を返してチェーン可能に

       def add_walls(self, material):
           if not self._house.foundation:
               raise ValueError("基礎なしで壁は建てられません!")
           self._house.walls = material
           return self

       def add_roof(self, material):
           if not self._house.walls:
               raise ValueError("壁なしで屋根は付けられません!")
           self._house.roof = material
           return self

       def build(self):
           # 家が完成しているかチェック
           if not all([
               self._house.foundation,
               self._house.walls,
               self._house.roof
           ]):
               raise ValueError("家が完成していません!")
           return self._house

   # 使い方
   def main():
       # 正しい順序で家を建てる
       house = (HouseBuilder()
                .build_foundation("concrete")
                .add_walls("brick")
                .add_roof("tile")
                .build())

       try:
           # 間違った順序で家を建てようとする
           wrong_house = (HouseBuilder()
                         .add_roof("tile")  # 基礎なしで屋根を付けようとする
                         .build())
       except ValueError as e:
           print(f"エラー: {e}")
家を建てるロジックにBuilderパターンを適用していました。
私はこのパターンを使ったことがないので、メリットを実感したことはありませんが想像するに、
- 実態と、構築を分けることで管理がしやすく、コードの責務が細かくなる
- buildで最終的に構築されるので、順序が増えたり減ったりしても、builderのメソッドチェーンを減らせばいいだけなので、割と変更しやすい。
以上が嬉しい部分かなぁと思います。Builderクラスの方に構築に必要な手順を記載できるので、手順が増えたり減ったりしてもBuilderクラスを変更するだけで良い点が嬉しいですかね。また、最終的にbuild()で実行できるので、バリデーションも一箇所にまとめられてスッキリします。
Azure Functionは様々なAzure サービスと接続することができるので、手順も多いし、多機能なのでこのBuilderパターンを採用したのかなと想像できます。(?)
buildはどこにいった?
なるほど、Builderパターンとは最終的にbuildを呼び出さないと適切なメタ情報を含んだ、元のインスタンスが生成されなさそうです。さて、上記で見たAzure Functionのソースコードの中にbuildしている部分はあったでしょうか? 実は、FunctionAppクラスが継承しているFunctionRegisterクラスの中でbuildされています。
class FunctionRegister(DecoratorApi, HttpFunctionsAuthLevelMixin, ABC):
       def __init__(self, auth_level: Union[AuthLevel, str], *args, **kwargs):
           """Interface for declaring top level function app class which will
           be directly indexed by Python Function runtime.

           :param auth_level: Determines what keys, if any, need to be present
           on the request in order to invoke the function.
           :param args: Variable length argument list.
           :param kwargs: Arbitrary keyword arguments.
           """
           DecoratorApi.__init__(self, *args, **kwargs)
           HttpFunctionsAuthLevelMixin.__init__(self, auth_level, *args, **kwargs)
           self._require_auth_level: Optional[bool] = None
           self.functions_bindings: Optional[Dict[Any, Any]] = None

       def get_functions(self) -> List[Function]:
           """Get the function objects in the function app.

           :return: List of functions in the function app.
           """
           functions = [function_builder.build(self.auth_level) # ここでbuildを呼び出している!!!
                        for function_builder in self._function_builders]

           if not self._require_auth_level:
               self._require_auth_level = any(
                   function.is_http_function() for function in functions)

           if not self._require_auth_level:
               logging.warning(
                   'Auth level is not applied to non http '
                   'function app. Ref: '
                   'https://docs.microsoft.com/azure/azure-functions/functions'
                   '-bindings-http-webhook-trigger?tabs=in-process'
                   '%2Cfunctionsv2&pivots=programming-language-python#http-auth')

           self.validate_function_names(functions=functions)

           return functions
なるほど。このget_functionsを呼び出せばbuildしてくれるんだなと。そして、Functionインスタンスが生成されてAzure Functionの機能が使えるようになるんだと。
いや、ちょっと待ってください。get_functionsってどっかで呼び出してましたっけ?この関数は、自動で呼び出されないはず。。うーん。
どこでget_functionsが呼ばれているんだろう?または、他でbuildしている場所があるのでしょうか?
これはまだ解決していないです。
issueで聞いてみよう
というわけで、issueとして発行して聞いてみたいと思います。お返事が来たら嬉しいなぁ。
何とも中途半端な記事かもしれませんが、ソースコードを読むことで様々な発見があるので、時間のある時に眺めてみることをお勧めします。一流の人たちが書いているコードですからね。それを読んで勉強できるなんて素晴らしいです。
Azure Function Service Bus トリガーのPython実装について
はじめに
masamoriです。
前回、Azure FunctionのPythonライブラリの実装を少しだけ見てみました。
さて、Azure のキューサービスにはAzure Service Bus というものがあります。
こちらのサービスは実務でも使っていて、Azure Functionにバインドしています。
今回はSservice BusキューをトリガーにしたAzure Functionの実装について紹介します。
Service Bus キュートリガーの基本
例によってVSCodeのAzure 拡張機能からFunctionを作成することができます。Functionテンプレートの中に、Service Bus Queueのテンプレートがあるのでそちらを使います
import logging

import azure.functions as func

app = func.FunctionApp()

logger = logging.getLogger()

@app.service_bus_queue_trigger(arg_name="azservicebus", queue_name="mysbqueue_add_params",
                                  connection="testbusqueue2_SERVICEBUS")
def servicebus_queue_trigger(azservicebus: func.ServiceBusMessage):
       data = azservicebus.get_body().decode('utf-8')
       logger.info(f'Python ServiceBus Queue trigger processed a message: {data}')
若干テンプレートとは変わっている部分もありますが、単純にdata変数を使用しているだけなので挙動はテンプレートのものと全く変わりません。
挙動としては、バインドしているキューにメッセージが送信されたらそれを検知してメッセージの中身を読む、というものです。とてもシンプルですね。
パラメータとしてはqueue_nameがバインドしているキューの名前で、connectionが接続文字列です。(ただし、これはセキュリティ的には非推奨。).
機能追加.
さて、メッセージキューにはSKU Standard以上でいくつかの機能を追加することができます。例えば、メッセージセッション・重複検出・自動転送などです。
代表してメッセージセッションについて紹介します。
この機能は、指定したセッションに対してFIFO処理を作成できるというもので、例えば複数のデバイスからメッセージが集められ、そのメッセージを複数のクライアントに対して送信したい時、クライアント毎にFIFO処理を作成することができます。
メッセージに生成されたセッションIDを付与してキューに送る必要があります。
このセッション機能を有効にしたままFunctionを使うには、追加でパラメータが必要になります。と言っても追加の方法はめっちゃ楽です。
@app.service_bus_queue_trigger(arg_name="azservicebus", queue_name="mysbqueue_add_params",is_sessions_enabled=True,
                                   connection="testbusqueue2_SERVICEBUS")
def servicebus_queue_trigger(azservicebus: func.ServiceBusMessage):
       data = azservicebus.get_body().decode('utf-8')
       logger.info(f'Python ServiceBus Queue trigger processed a message: {data}')
is_sessions_enabled=Trueこれを追加するだけです。簡単ですね。
ちなみに、servicebus_queue_triggerのソースコードは以下です.
def service_bus_queue_trigger(
                self,
                arg_name: str,
                connection: str,
                queue_name: str,
                data_type: Optional[Union[DataType, str]] = None,
                access_rights: Optional[Union[AccessRights, str]] = None,
                is_sessions_enabled: Optional[bool] = None,
                cardinality: Optional[Union[Cardinality, str]] = None,
                **kwargs: Any) -> Callable[..., Any]:
            """The on_service_bus_queue_change decorator adds
            :class:`ServiceBusQueueTrigger` to the :class:`FunctionBuilder` object
            for building :class:`Function` object used in worker function
            indexing model. This is equivalent to defining ServiceBusQueueTrigger
            in the function.json which enables your function be triggered when
            new message(s) are sent to the service bus queue.
            All optional fields will be given default value by function host when
            they are parsed by function host.

            Ref: https://aka.ms/azure-function-binding-service-bus

            :param arg_name: The name of the variable that represents the
            :class:`ServiceBusMessage` object in function code.
            :param connection: The name of an app setting or setting collection
            that specifies how to connect to Service Bus.
            :param queue_name: Name of the queue to monitor.
            :param data_type: Defines how Functions runtime should treat the
            parameter value.
            :param access_rights: Access rights for the connection string.
            :param is_sessions_enabled: True if connecting to a session-aware
            queue or subscription.
            :param cardinality: Set to many in order to enable batching.
            :return: Decorator function.
            """

            @self._configure_function_builder
            def wrap(fb):
                def decorator():
                    fb.add_trigger(
                        trigger=ServiceBusQueueTrigger(
                            name=arg_name,
                            connection=connection,
                            queue_name=queue_name,
                            data_type=parse_singular_param_to_enum(data_type,
                                                                   DataType),
                            access_rights=parse_singular_param_to_enum(
                                access_rights,
                                AccessRights),
                            is_sessions_enabled=is_sessions_enabled,
                            cardinality=parse_singular_param_to_enum(cardinality,
                                                                     Cardinality),
                            **kwargs))
                    return fb

                return decorator()

            return wrap
前回紹介したhttpトリガーとほぼ一緒のコードです。デコレータでパラメータを指定して、FunctionBuilderインスタンスにトリガーを追加しているだけです。
@app.function_nameについて
VSCodeで作成するテンプレートと、ドキュメントのコードには若干の違いがあります。
ドキュメントで紹介されているservice_bus_queue_triggerは以下の通りです。
import logging
import azure.functions as func

app = func.FunctionApp()

@app.function_name(name="ServiceBusQueueTrigger1")
@app.service_bus_queue_trigger(arg_name="msg",
                                   queue_name="<QUEUE_NAME>",
                                   connection="<CONNECTION_SETTING>")
def test_function(msg: func.ServiceBusMessage):
    logging.info('Python ServiceBus queue trigger processed message: %s',
                 msg.get_body().decode('utf-8'))
@app.function_name(name="ServiceBusQueueTrigger1")の部分が追加されています。
この部分に該当するソースコードは以下です
def function_name(self, name: str,
                      setting_extra_fields: Optional[Dict[str, Any]] = None,
                      ) -> Callable[..., Any]:
        """Optional: Sets name of the :class:`Function` object. If not set,
        it will default to the name of the method name.

        :param name: Name of the function.
        :param setting_extra_fields: Keyword arguments for specifying
        additional setting fields
        :return: Decorator function.
        """
        if setting_extra_fields is None:
            setting_extra_fields = {}

        @self._configure_function_builder
        def wrap(fb):
            def decorator():
                fb.add_setting(setting=FunctionName(
                    function_name=name,
                    **setting_extra_fields))
                return fb

            return decorator()

        return wrap
コメントにも書いてある通り、これはオプショナルな設定です。このデコレータを指定しない場合、自分で定義した関数の名前がデフォルトで使用されます。ドキュメントの例で言えば、test_functionがAzureで認識されるFunction名になります。VSCodeで作成するテンプレートは同じ名前の関数がデフォルトで生成されるので、自分で定義する関数名を変えるか、デコレータでFunctionの名前を指定しないと後で混乱する、あるいは同じFunctionのリソースを使用する場合名前の衝突が起きる可能性があります。
Azure Function HttpトリガーのPython実装に迫る
はじめに
masamoriです。
僕は普段クラウドサービスはAzureを使っています。中でもよく使うサービスはApp service系のPassなのです。Azure Functionもよく使っているのですが、よく考えたら実装を覗いたことないなー、と思いAzure FunctionのPython Libraryのコードを読んでみました。
Httpトリガー
Functionは様々なAzureサービスをトリガーにして実行することができますが、一番オーソドックスなHttpトリガーについてコードを読みたいと思います。
まず、VSCodeのFunctionツールから作成できるHttpトリガーのコードはこちらです。
import azure.functions as func
  import logging

  app = func.FunctionApp(http_auth_level=func.AuthLevel.ANONYMOUS)

  @app.route(route="http_trigger")
  def http_trigger(req: func.HttpRequest) -> func.HttpResponse:
      logging.info('Python HTTP trigger function processed a request.')

      name = req.params.get('name')
      if not name:
          try:
              req_body = req.get_json()
          except ValueError:
              pass
          else:
              name = req_body.get('name')

      if name:
          return func.HttpResponse(f"Hello, {name}. This HTTP triggered function executed successfully.")
      else:
          return func.HttpResponse(
               "This HTTP triggered function executed successfully. Pass a name in the query string or in the request body for a personalized response.",
               status_code=200
          )
appデコレータで関数をトリガー化しているので、FunctionAppを探します。
FunctionAppはazure/functions/init.pyの中に定義されていて、fucntions配下のdecorators/function_app.pyの中に定義されています。
class FunctionApp(FunctionRegister, TriggerApi, BindingApi, SettingsApi):
      """FunctionApp object used by worker function indexing model captures
      user defined functions and metadata.

      Ref: https://aka.ms/azure-function-ref
      """

      def __init__(self,
                   http_auth_level: Union[AuthLevel, str] = AuthLevel.FUNCTION):
          """Constructor of :class:`FunctionApp` object.

          :param http_auth_level: Determines what keys, if any, need to be
          present
          on the request in order to invoke the function.
          """
          super().__init__(auth_level=http_auth_level)
インスタンス化する際に必要な引数としてhttp_auth_levelがあります。デフォルトの設定ではFUNCTIONとなっており、特定の関数エンドポイントへのアクセスのみを許可するキーの設定が必要となります。今回の記事ではANONYMOUSにしているので、キーの設定は必要ありません。localで試したい場合はANONYMOUSで十分だと思います。
FunctionAppはTriggerApi, BindingApi, SettingsApiを継承しています。では、TriggerApiを見ましょう。
class TriggerApi(DecoratorApi, ABC):
      """Interface to extend for using existing trigger decorator functions."""

      def route(self,
                route: Optional[str] = None,
                trigger_arg_name: str = 'req',
                binding_arg_name: str = '$return',
                methods: Optional[
                    Union[Iterable[str], Iterable[HttpMethod]]] = None,
                auth_level: Optional[Union[AuthLevel, str]] = None,
                trigger_extra_fields: Optional[Dict[str, Any]] = None,
                binding_extra_fields: Optional[Dict[str, Any]] = None
                ) -> Callable[..., Any]:
          """The route decorator adds :class:`HttpTrigger` and
          :class:`HttpOutput` binding to the :class:`FunctionBuilder` object
          for building :class:`Function` object used in worker function
          indexing model. This is equivalent to defining HttpTrigger
          and HttpOutput binding in the function.json which enables your
          function be triggered when http requests hit the specified route.
          All optional fields will be given default value by function host when
          they are parsed by function host.

          Ref: https://aka.ms/azure-function-binding-http

          :param route: Route for the http endpoint, if None, it will be set
          to function name if present or user defined python function name.
          :param trigger_arg_name: Argument name for :class:`HttpRequest`,
          defaults to 'req'.
          :param binding_arg_name: Argument name for :class:`HttpResponse`,
          defaults to '$return'.
          :param methods: A tuple of the HTTP methods to which the function
          responds.
          :param auth_level: Determines what keys, if any, need to be present
          on the request in order to invoke the function.
          :return: Decorator function.
          :param trigger_extra_fields: Additional fields to include in trigger
          json. For example,
          >>> data_type='STRING' # 'dataType': 'STRING' in trigger json
          :param binding_extra_fields: Additional fields to include in binding
          json. For example,
          >>> data_type='STRING' # 'dataType': 'STRING' in binding json
          """
          if trigger_extra_fields is None:
              trigger_extra_fields = {}
          if binding_extra_fields is None:
              binding_extra_fields = {}

          @self._configure_function_builder
          def wrap(fb):
              def decorator():
                  fb.add_trigger(trigger=HttpTrigger(
                      name=trigger_arg_name,
                      methods=parse_iterable_param_to_enums(methods, HttpMethod),
                      auth_level=parse_singular_param_to_enum(auth_level,
                                                              AuthLevel),
                      route=route, **trigger_extra_fields))
                  fb.add_binding(binding=HttpOutput(
                      name=binding_arg_name, **binding_extra_fields))
                  return fb

              return decorator()

          return wrap

     ...以下略
routeメソッドのroute引数はエンドポイントです。また、Httpリクエストとレスポンスを定義できて、methodも定義できます。今回のケースではapp.route"を使用しているので、httpトリガーが呼び出されます。
また、ここではデコレーターが定義されていますが、Functionがどのように機能しているかに焦点を当てると、@self._configure_function_builderが重要になってきます。このデコレータでFunctionBuilderが生成され、自分で定義した関数に@appとしてデコレータを付与すると、その関数はトリガーとして機能するようになります。
では、TriggerAPIには'DecoratorApi'が継承されているので、見ていきましょう。
class DecoratorApi(ABC):
      """Interface which contains essential decorator function building blocks
      to extend for creating new function app or blueprint classes.
      """

      def __init__(self, *args, **kwargs):
          self._function_builders: List[FunctionBuilder] = []
          self._app_script_file: str = SCRIPT_FILE_NAME

      ... 略

      def _validate_type(self,
                       func: Union[Callable[..., Any], FunctionBuilder]) \
            -> FunctionBuilder:
        """Validate the type of the function object and return the created
        :class:`FunctionBuilder` object.


        :param func: Function object passed to
         :meth:`_configure_function_builder`
        :raises ValueError: Raise error when func param is neither
         :class:`Callable` nor :class:`FunctionBuilder`.
        :return: :class:`FunctionBuilder` object.
        """
        if isinstance(func, FunctionBuilder):
            fb = self._function_builders.pop()
        elif callable(func):
            fb = FunctionBuilder(func, self._app_script_file)
        else:
            raise ValueError(
                "Unsupported type for function app decorator found.")
        return fb

      def _configure_function_builder(self, wrap) -> Callable[..., Any]:
              """Decorator function on user defined function to create and return
               :class:`FunctionBuilder` object from :class:`Callable` func.
              """

              def decorator(func):
                  fb = self._validate_type(func)
                  self._function_builders.append(fb)
                  return wrap(fb)

              return decorator
_configure_function_builderというデコレータを作成し、そのメソッドを通してFunctionBuilderをラップしています。ここでFunctionBuilderのバリデーションをして、FunctionBuilderオブジェクトをリストに追加しています。そしてDecoratorApiを継承したTriggerApiの中で、_configure_function_builderがデコレータとして使用され、FunctionBuilderオブジェクトにトリガーが追加されます。(TriggerApiでHttpTriggerとなっていますね)。これはroute(Httpトリガー)を@app.routeで呼び出しているからです。
例えば、timer_trigerを呼び出したかったら、routeの代わりに.
def timer_trigger(self,
                      arg_name: str,
                      schedule: str,
                      run_on_startup: Optional[bool] = None,
                      use_monitor: Optional[bool] = None,
                      data_type: Optional[Union[DataType, str]] = None,
                      **kwargs: Any) -> Callable[..., Any]:
        """The schedule or timer decorator adds :class:`TimerTrigger` to the
        :class:`FunctionBuilder` object
        for building :class:`Function` object used in worker function
        indexing model. This is equivalent to defining TimerTrigger
        in the function.json which enables your function be triggered on the
        specified schedule.
        All optional fields will be given default value by function host when
        they are parsed by function host.

        Ref: https://aka.ms/azure-function-binding-timer

        :param arg_name: The name of the variable that represents the
        :class:`TimerRequest` object in function code.
        :param schedule: A string representing a CRON expression that will
        be used to schedule a function to run.
        :param run_on_startup: If true, the function is invoked when the
        runtime starts.
        :param use_monitor: Set to true or false to indicate whether the
        schedule should be monitored.
        :param data_type: Defines how Functions runtime should treat the
        parameter value.
        :return: Decorator function.
        """

        @self._configure_function_builder
        def wrap(fb):
            def decorator():
                fb.add_trigger(
                    trigger=TimerTrigger(
                        name=arg_name,
                        schedule=schedule,
                        run_on_startup=run_on_startup,
                        use_monitor=use_monitor,
                        data_type=parse_singular_param_to_enum(data_type,
                                                               DataType),
                        **kwargs))
                return fb

            return decorator()

        return wrap

    schedule = timer_trigger
こいつを@app.timer_triggerデコレーターとして呼び出せばいいです。TriggerApiの中に、他サービスで使えるトリガーの定義が書いてあるので、自分の使いたいトリガーの挙動が意図しないものであった場合、このTriggerApiクラスを見ることをお勧めします。どんなパラメーターが使用できるのか確認もできます。
まとめ
流れとして、
- FunctionApp: Azure Functions アプリケーション全体を管理し、ユーザー定義の関数とトリガーの結びつきを定義。
- TriggerApi: HTTP トリガーや他のトリガーを関数に紐付け、どのリクエストやイベントで関数が実行されるかを定義。
- DecoratorApi: デコレータを通じて、関数に FunctionBuilder を適用し、トリガーやバインディングを設定するための基盤を提供。
- FunctionBuilder: 関数のトリガーやバインディングを設定し、関数を構築します。最終的に、Azure Functions で動作するための関数が完成。
このような感じでしょうか。
似たような実装部分が多く、読みにくさも感じないコードなので、また機会があったらソースコードを読んでみたいと思います。
Python リストの作成方法で占有するメモリサイズが異なる その3(終)
はじめに
masamoriです。
このシリーズ最後です。
今回は、[0 for _ in range(3)]です。コードを追いましょう。
改めて確認
import sys

list = [0 for _ in range(3)]

print("sizeof list: ", sys.getsizeof(list))  #88
[0 for _ in range(3)]の場合、メモリの使用量は上記のようになります。
disモジュールを使って計算ロジックを確認しましょう。
import dis

print("disassemble [0 for _ in range(3)]")
dis.dis("[0 for i in range(3)]")

    ## 以下結果 ##
   disassemble [0 for _ in range(3)]
  0           0 RESUME                   0

  1           2 PUSH_NULL
              4 LOAD_NAME                0 (range)
              6 LOAD_CONST               0 (3)
              8 CALL                     1
             16 GET_ITER
             18 LOAD_FAST_AND_CLEAR      0 (i)
             20 SWAP                     2
             22 BUILD_LIST               0
             24 SWAP                     2
        >>   26 FOR_ITER                 4 (to 38)
             30 STORE_FAST               0 (i)
             32 LOAD_CONST               1 (0)
             34 LIST_APPEND              2
             36 JUMP_BACKWARD            6 (to 26)
        >>   38 END_FOR
             40 SWAP                     2
             42 STORE_FAST               0 (i)
             44 RETURN_VALUE
        >>   46 SWAP                     2
             48 POP_TOP
             50 SWAP                     2
             52 STORE_FAST               0 (i)
             54 RERAISE                  0
ExceptionTable:
  22 to 38 -> 46 [2]
こうなります。長いですね。
しかし、大事な部分はメモリ割り当ての部分LIST_APPENDです。
CPython
では、該当部分PyList_Appendから見ていきます。
int
   PyList_Append(PyObject *op, PyObject *newitem)
   {
       if (PyList_Check(op) && (newitem != NULL)) {
           int ret;
           Py_BEGIN_CRITICAL_SECTION(op);
           ret = _PyList_AppendTakeRef((PyListObject *)op, Py_NewRef(newitem));
           Py_END_CRITICAL_SECTION();
           return ret;
       }
       PyErr_BadInternalCall();
       return
_PyList_AppendTakeRefを確認します。
_PyList_AppendTakeRef(PyListObject *self, PyObject *newitem)
   {
       assert(self != NULL && newitem != NULL);
       assert(PyList_Check(self));
       Py_ssize_t len = Py_SIZE(self);
       Py_ssize_t allocated = self->allocated;
       assert((size_t)len + 1 < PY_SSIZE_T_MAX);
       if (allocated > len) {
   #ifdef Py_GIL_DISABLED
           _Py_atomic_store_ptr_release(&self->ob_item[len], newitem);
   #else
           PyList_SET_ITEM(self, len, newitem);
   #endif
           Py_SET_SIZE(self, len + 1);
           return 0;
       }
       return _PyList_AppendTakeRefListResize(self, newitem);
   }
リストに対して十分なメモリが割り当てられている場合はreturn 0で処理を終えます。
しかし、十分なメモリが割り当てられていない場合は_PyList_AppendTakeRefListResizeを呼び出します。
最初の呼び出しではメモリはまだ割り当てられていないはずなので、_PyList_AppendTakeRefListResizeが呼び出されるはずです。
_PyList_AppendTakeRefListResize(PyListObject *self, PyObject *newitem)
   {
       Py_ssize_t len = Py_SIZE(self);
       assert(self->allocated == -1 || self->allocated == len);
       if (list_resize(self, len + 1) < 0) {
           Py_DECREF(newitem);
           return -1;
       }
       FT_ATOMIC_STORE_PTR_RELEASE(self->ob_item[len], newitem);
       return 0;
   }
現在のリストのサイズを取得し、len + 1に拡張します。この時点で割り当てが少ない場合、list_resizeが呼び出されます。
static int
   list_resize(PyListObject *self, Py_ssize_t newsize)
   {
       size_t new_allocated, target_bytes;
       Py_ssize_t allocated = self->allocated;

       /* Bypass realloc() when a previous overallocation is large enough
          to accommodate the newsize.  If the newsize falls lower than half
          the allocated size, then proceed with the realloc() to shrink the list.
       */
       if (allocated >= newsize && newsize >= (allocated >> 1)) {
           assert(self->ob_item != NULL || newsize == 0);
           Py_SET_SIZE(self, newsize);
           return 0;
       }

       /* This over-allocates proportional to the list size, making room
        * for additional growth.  The over-allocation is mild, but is
        * enough to give linear-time amortized behavior over a long
        * sequence of appends() in the presence of a poorly-performing
        * system realloc().
        * Add padding to make the allocated size multiple of 4.
        * The growth pattern is:  0, 4, 8, 16, 24, 32, 40, 52, 64, 76, ...
        * Note: new_allocated won't overflow because the largest possible value
        *       is PY_SSIZE_T_MAX * (9 / 8) + 6 which always fits in a size_t.
        */
       new_allocated = ((size_t)newsize + (newsize >> 3) + 6) & ~(size_t)3;
       /* Do not overallocate if the new size is closer to overallocated size
        * than to the old size.
        */
       if (newsize - Py_SIZE(self) > (Py_ssize_t)(new_allocated - newsize))
           new_allocated = ((size_t)newsize + 3) & ~(size_t)3;

       if (newsize == 0)
           new_allocated = 0;

   ...略
重要なのはコメントの部分です。実はPythonはリストを拡大するたびにメモリを割り当てているわけではありません。ある程度のかたまりでメモリを増やしていきます。
* Add padding to make the allocated size multiple of 4. * The growth pattern is: 0, 4, 8, 16, 24, 32, 40, 52, 64, 76, ... この部分ですね。
なのでこの関数が最初に呼び出された時、まずは4つ分の長さのメモリが割り当てられます。
メモリの割り当てが終わり、要素が増加する分だけバイトコードLIST_APPENDが呼び出されます。しかし、list_resizeの最初の呼び出しでリストの要素4つ分メモリがすでに割り当てられているので、list_resizeは今回のケースではもう呼び出されません。
というわけで[0 for _ in range(3)]に割り当てられるメモリ量は
56(リストオブジェクトのbyteサイズ) + 4(要素数) * 8(byte) = 88(byte).
ということになるのですね。
確認
ということは、要素の数がひとつ増えたからといって、即座にメモリは再割り当てされないケースもあるということです。コメントから読み取れる情報から推測すると、[0 for _ in range(2)] と [0 for _ in range(3)]、[0 for _ in range(5)] と
[0 for _ in range(7)] はメモリのサイズが一緒のはずです。
確認してみましょう。
import sys

list1 = [0 for _ in range(2)]
list2 = [0 for _ in range(3)]
list3 = [0 for _ in range(5)]
list4 = [0 for _ in range(7)]

print("sizeof list1: ", sys.getsizeof(list1)) # 88
print("sizeof list2: ", sys.getsizeof(list2)) # 88
print("sizeof list3: ", sys.getsizeof(list3)) # 120
print("sizeof list4: ", sys.getsizeof(list4)) # 120
はい、同じでした。いちいちメモリを再割り当てしていると計算効率が下がってしまうのですのね。ある程度の余裕を持ってあらかじめメモリを割り当てる方が効率が良い、ということなのでしょう。
ちなみに、こちらも元記事とはpython内部の計算のロジックは違いました。(結果は一緒)
元記事はこちら.
Pythonの内部実装を見るって、なかなか面白いです。
また面白そうなネタがあれば書きたいと思います。
Python リストの作成方法で占有するメモリサイズが異なる その2
はじめに
masamoriです。
少々間が空きましたが、この記事の続きです。
今回は、Pythonのリスト[0, 0, 0]についてメモリサイズがどのように計算されているか、コードを追いたいと思います。
改めて確認
import sys

list2 = [0, 0, 0]

print("sizeof list2: ", sys.getsizeof(list2)) #88
[0,0,0]の場合、メモリの使用量は上記のようになります。
disモジュールを使って計算ロジックを確認しましょう。
import dis

print("disassemble [0, 0, 0]")
dis.dis("[0, 0, 0]")

    ## 以下結果 ##
    disassemble [0, 0, 0]
      0           0 RESUME                   0

      1           2 BUILD_LIST               0
                  4 LOAD_CONST               0 ((0, 0, 0))
                  6 LIST_EXTEND              1
                  8 RETURN_VALUE
こうなります。
では、該当のCPythonの実装を確認します。
CPython
では、List_EXTENDからいきましょう。
static PyObject *
    list_extend(PyListObject *self, PyObject *iterable)
    /*[clinic end generated code: output=630fb3bca0c8e789 input=979da7597a515791]*/
    {
        if (_list_extend(self, iterable) < 0) {
            return NULL;
        }
        Py_RETURN_NONE;
    }
_list_extendを確認します
static int
    _list_extend(PyListObject *self, PyObject *iterable)
    {
        // Special case:
        // lists and tuples which can use PySequence_Fast ops
        int res = -1;
        if ((PyObject *)self == iterable) {
            Py_BEGIN_CRITICAL_SECTION(self);
            res = list_inplace_repeat_lock_held(self, 2);
            Py_END_CRITICAL_SECTION();
        }
        else if (PyList_CheckExact(iterable)) {
            Py_BEGIN_CRITICAL_SECTION2(self, iterable);
            res = list_extend_lock_held(self, iterable);
            Py_END_CRITICAL_SECTION2();
        }
        .....(省略)
        return res;
    }
さて、ここで条件分岐があります。
結論から言うと、else if (PyList_CheckExact(iterable)に進みます。
disasemble(disモジュールを使った)した結果を見てみましょう。
最初に作成されるリストは空のリストで、次に作成されるiterableは(0,0,0)というタプルになります。そして、このタプルが空のリストに追加されるという流れです。
この時、selfは空のリストでiterableはタプルですから同じものではありません。よって、else if (PyList_CheckExact(iterable)に進みます。
res = list_extend_lock_held(self, iterable);に注目し、list_extend_lock_heldの実装を見ます。
static int
    list_extend_lock_held(PyListObject *self, PyObject *iterable)
    {
        PyObject *seq = PySequence_Fast(iterable, "argument must be iterable");
        if (!seq) {
            return -1;
        }

        int res = list_extend_fast(self, seq);
        Py_DECREF(seq);
        return res;
    }
list_extend_fastに進みます
static int
    list_extend_fast(PyListObject *self, PyObject *iterable)
    {
        Py_ssize_t n = PySequence_Fast_GET_SIZE(iterable);
        if (n == 0) {
            /* short circuit when iterable is empty */
            return 0;
        }

        Py_ssize_t m = Py_SIZE(self);
        // It should not be possible to allocate a list large enough to cause
        // an overflow on any relevant platform.
        assert(m < PY_SSIZE_T_MAX - n);
        if (self->ob_item == NULL) {
            if (list_preallocate_exact(self, n) < 0) {
                return -1;
            }
            Py_SET_SIZE(self, n);
        }
        else if (list_resize(self, m + n) < 0) {
            return -1;
        }

        // note that we may still have self == iterable here for the
        // situation a.extend(a), but the following code works
        // in that case too.  Just make sure to resize self
        // before calling PySequence_Fast_ITEMS.
        //
        // populate the end of self with iterable's items.
        PyObject **src = PySequence_Fast_ITEMS(iterable);
        PyObject **dest = self->ob_item + m;
        for (Py_ssize_t i = 0; i < n; i++) {
            PyObject *o = src[i];
            FT_ATOMIC_STORE_PTR_RELEASE(dest[i], Py_NewRef(o));
        }
        return 0;
    }
self->ob_item == NULLここに注目です。今回の場合、selfは空のリストです。なので、NULL判定になります。
そして、list_preallocate_exactが呼ばれます
static int
    list_preallocate_exact(PyListObject *self, Py_ssize_t size)
    {
        PyObject **items;
        assert(self->ob_item == NULL);
        assert(size > 0);

        /* Since the Python memory allocator has granularity of 16 bytes on 64-bit
         * platforms (8 on 32-bit), there is no benefit of allocating space for
         * the odd number of items, and there is no drawback of rounding the
         * allocated size up to the nearest even number.
         */
        size = (size + 1) & ~(size_t)1;
    ....(省略)
    #endif
        FT_ATOMIC_STORE_PTR_RELEASE(self->ob_item, items);
        self->allocated = size;
        return 0;
    }
ようやく辿り着きました。
重要な部分はsize = (size + 1) & ~(size_t)1;です。この実装だと、割り当てる要素の数が偶数になるように調整されています。
今回のケースだと、[0,0,0]の3つの要素でリストが成り立っているので、4つ分の要素のメモリがこのリストに割り当てられます。
最終的にはself->allocated = sizeで計算されたサイズを割り当てます。
というわけで最終的なメモリサイズは.
56(リストオブジェクトのbyteサイズ) + 4(要素数) * 8(byte) = 88(byte).
ということになるのですね。
確認
ということは、[0,0,0,0]と[0,0,0]は同じ量のメモリが割り当てられるのでしょうか?
import sys

list1 = [0, 0, 0]
list2 = [0, 0, 0, 0]

print("sizeof list1: ", sys.getsizeof(list1)) #88
print("sizeof list1: ", sys.getsizeof(list2)) #88
はい、同じでした。奇数偶数判定でメモリの割当量が決まるとはなんとも単純そうではありますが、元記事のPython3.9よりはメモリ効率が上がっているので、このアルゴリズムを実装するのがそもそも大変だったんじゃないかなと推察されます。
記事で紹介された最後の計算ロジックについてはまた後日書きます。
ちなみに元記事はこちら.
